Thursday, April 24, 2008
Out of Hibernation
I have been in somewhat of a hibernation phase for some time now. I apologize to all those who commented or had a question posted on the blogs. The burden of school work is slightly relaxed now. I shall try to answer all queries one by one. Please do check back!
Monday, February 11, 2008
How to make a theme NeoDock compatible?
Making a theme NeoDock compatible is easy. If you have read "How to make NeoDock Manager see my Plugins?", then you might have already figured it out. The Neo Dockstation is nothing but a layout switcher, using some markers on the theme XML file to figure out what to replace for what. So, you just need to set those markers on your theme layout file.
Any theme file for the Neo interface has two plugin entries - one for the top status bar and the other for the Neo plugin. The markers are placed for the top status bar plugin - the first <plugin... entry in the XML file.
1) Place the following line before the start of the plugin tag.
<!-- NeoDock Markup START - DONOT CHANGE THIS LINE!! -->
2) Place the following line after the end of the plugin tag, i.e. after </plugin>
<!-- NeoDock Markup END - DONOT CHANGE THIS LINE!! -->
Since these lines are marker, you must place them in separate lines, with no spaces or tabs before or after them.
With that, the switcher can now work with your theme. Do take a look at the NeoDock.home.xml file in \Application Data\Home for a complete example.
Sunday, February 10, 2008
How to make NeoDock Manager see my Plugins?
The NeoDock Manager is an application to build the Neo Dockstation. It detects installed plugins and shows them up on the interface so that you can add it to the dockstation. This tutorial shows how you can make your other plugins show up on NeoDock Manager. To do this, you shall need 2 XML files, 1 DLL file and some cosmetics!!
Let me start with how the Neo Dockstation works. There is nothing too tricky in it. The dockstation starts with the current theme XML file. Using two marker lines, it knows which plugin tag corresponds to the top portion of the Neo interface. The rest is simple. It creates a new layout file with the plugin tag from the current theme removed and inserts the plugin tag for the plugin to be loaded. After that it just loads this new layout!! Sometimes the most trivial is not the easiest to find - I went through the whole process of writing a plugin that loads other plugins before stumbling upon this method.
So, back to NeoDock Manager. Lets say you want the default status bar plugin to be visible in NeoDock Manager.
1) Create a folder in \Program Files\NeoDock\Plugins. You can name it anything. Say we call it "Shadow Status Bar".
2) Inside the folder, you shall have to create two XML files - one must be named setup.xml, the other one your choice, say we name it monobar.xml.
3) The setup.xml is what the NeoDock Manager will parse to find information about a plugin. Here is how it looks for the Shadow iconbar:
4) Now lets create the other XML file - monobar.xml. This file contains the plugin tag that usually goes into the theme layout XML file. For the shadow status bar its something like this -
Validity checks are made for the attributes in the plugin tag, meaning, the dll and xml files must be present at the location specified and the CLSID should match with the one given in the second xml file (monobar.xml in this example) . Other tags have some default values if not present.
The Manager attempts to create the required GUID entry in the registry for the dll. However, if an entry already exists with the given GUID, it shall not overwrite it. This is because, you might have made a mistake in specifying the right GUID for the plugin dll, in which case, overwriting the entry with the wrong information may crash some other program.
Feel free to leave me a comment if you have a problem! And also, please let me know if you find cool non-selectable plugins perfect for the Neo Dockstation.
Let me start with how the Neo Dockstation works. There is nothing too tricky in it. The dockstation starts with the current theme XML file. Using two marker lines, it knows which plugin tag corresponds to the top portion of the Neo interface. The rest is simple. It creates a new layout file with the plugin tag from the current theme removed and inserts the plugin tag for the plugin to be loaded. After that it just loads this new layout!! Sometimes the most trivial is not the easiest to find - I went through the whole process of writing a plugin that loads other plugins before stumbling upon this method.
So, back to NeoDock Manager. Lets say you want the default status bar plugin to be visible in NeoDock Manager.
1) Create a folder in \Program Files\NeoDock\Plugins. You can name it anything. Say we call it "Shadow Status Bar".
2) Inside the folder, you shall have to create two XML files - one must be named setup.xml, the other one your choice, say we name it monobar.xml.
3) The setup.xml is what the NeoDock Manager will parse to find information about a plugin. Here is how it looks for the Shadow iconbar:
<?xml version="1.0" encoding="UTF-8" ?>Lets take a look at these tags one by one.
<neodock>
<plugin name="Shadow Iconbar" dllsource="\Windows\tpcutil.dll" clsid="{837FC251-FE69-43ad-84E0-EBCEDEBA0884}" xmlsource="\Program Files\NeoDock\Plugins\Shadow Status Bar\monobar.xml">
<config exe="" />
<icon source="\Program Files\NeoDock\Plugins\Shadow Status Bar\iconbar.png" />
<title text="Status Bar" />
<description text="Default Icon Notifications" />
</plugin>
</neodock>
neodock: This tag is a must to indicate that you are writing a setup for a NeoDock plugin.
plugin: This tag and all of its attributes is a must.
name = name that NeoDock Manager should display in its interface for this plugin.
dllsource = full path to the dll for this plugin.
clsid = GUID of this plugin.
xmlsource = full path to the xml file for this plugin. I shall explain what this file contains in a while.
The following four entries are optional.
config: exe = full path to the executable that can be used to configure this plugin.
icon: source = full path to the image to display for this plugin in the dockstation.
title: text = a title for this plugin; used in the dockstation.
description: text = a description for the plugin; used in the dockstation.
4) Now lets create the other XML file - monobar.xml. This file contains the plugin tag that usually goes into the theme layout XML file. For the shadow status bar its something like this -
<plugin clsid="{837FC251-FE69-43ad-84E0-EBCEDEBA0884}" name="iconbar" height="20">5) That's about it. The next time you run NeoDock Manager, it will scan through all folders in \Program Files\NeoDock\Plugins and will parse the setup.xml files in those folders. If everything is valid and relevant files do exist, the plugin would show up on the Manager. Thereafter you can add it to the dockstation.
<iconbar fgcolor="COLOR_TRAYTEXT"/>
<background bgimage="\windows\CHome_framework_status_bar_bg.png" halign="center" bgcolor="COLOR_TRAYGRADLEFT" b-border-color="COLOR_WINDOWFRAME"/>
</plugin>
Validity checks are made for the attributes in the plugin tag, meaning, the dll and xml files must be present at the location specified and the CLSID should match with the one given in the second xml file (monobar.xml in this example) . Other tags have some default values if not present.
The Manager attempts to create the required GUID entry in the registry for the dll. However, if an entry already exists with the given GUID, it shall not overwrite it. This is because, you might have made a mistake in specifying the right GUID for the plugin dll, in which case, overwriting the entry with the wrong information may crash some other program.
Feel free to leave me a comment if you have a problem! And also, please let me know if you find cool non-selectable plugins perfect for the Neo Dockstation.
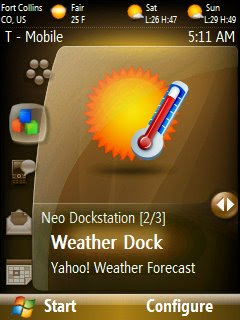
Configuring the Weather Dock
The Weather Dock is a plugin for WM6 Standard reading weather information from Yahoo! Weather feed. The plugin displays
1) The configure program is installed at \Program Files\NeoDock\Plugins\Weather Dock and is called WeatherConfig.exe. Alternatively, you can just click on the Configure button on the Neo Dockstation.

2) Different items on the interface are as follows:
4) Press OK. Once done, exit out. If you are using the plugin on the Neo Dockstation, reload the plugin.
When the Weather Dock is first loaded, it tries to update the current weather. The Weather Dock then updates weather information at "Update every" intervals. If an update fails, the Weather Dock keeps trying every minute until it is able to do so. Once updated, it goes back to the "Update every" frequency.
NOTE: I have noticed that the icon for the current weather is not changing since tomorrow. Even during the night, it shows the sun!!! I thought the plugin has malfunctioned. However that was not the case as it seems. The problem was rather with the RSS feed I was getting from Yahoo! Weather. If you find errors in the images displayed, please perform the following check first: open the URL http://weather.yahoo.com/forecastrss?p=ID , where ID is your Location ID, and see the output of the page in a browser. For me, even this page has been displaying the same icon for a few days. It seems the condition code is not being updated in the server for some reason.
- Temperature and text description for current weather at a location provided as a US Zip Code or a Yahoo! Location ID.
- Feels like temperature and wind speed.
- Lows and highs forecast for today and tomorrow.
- Customizable units, update frequency and font colors.
- Customizable background.
1) The configure program is installed at \Program Files\NeoDock\Plugins\Weather Dock and is called WeatherConfig.exe. Alternatively, you can just click on the Configure button on the Neo Dockstation.

2) Different items on the interface are as follows:
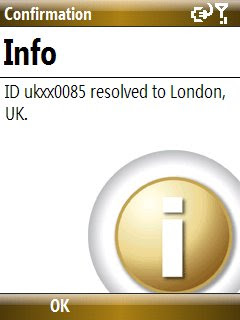
ID: The ID can be a US Zip Code or a Yahoo! Location ID. The Yahoo! Location ID can be retrieved from http://weather.yahoo.com. After you enter your location and the weather page is loaded, check the URL of the page. The Yahoo! Location ID is the name of the html page. For e.g., if the URL is http://weather.yahoo.com/forecast/XYZ.html, then the Yahoo! Location ID is XYZ.3) Once you have entered all the information, press Save. Give the program some time to contact the server and resolve the ID.
Unit: English shows temperature in Fahrenheit and speed in MPH. Metric shows it in Celcius and KmPH respectively.
Update every: The frequency between updates. Weather data is updated from the server at this frequency.
Color codes: Color codes means the color of the font on the plugin. "Fresh" indicates the color to use when displaying data that has been successfully updated the last time an update was tried. If an update fails, the "Stale" color is used. Use HTML coding to specify the color - #RRGGBB.

4) Press OK. Once done, exit out. If you are using the plugin on the Neo Dockstation, reload the plugin.
When the Weather Dock is first loaded, it tries to update the current weather. The Weather Dock then updates weather information at "Update every" intervals. If an update fails, the Weather Dock keeps trying every minute until it is able to do so. Once updated, it goes back to the "Update every" frequency.
NOTE: I have noticed that the icon for the current weather is not changing since tomorrow. Even during the night, it shows the sun!!! I thought the plugin has malfunctioned. However that was not the case as it seems. The problem was rather with the RSS feed I was getting from Yahoo! Weather. If you find errors in the images displayed, please perform the following check first: open the URL http://weather.yahoo.com/forecastrss?p=ID , where ID is your Location ID, and see the output of the page in a browser. For me, even this page has been displaying the same icon for a few days. It seems the condition code is not being updated in the server for some reason.
Saturday, February 9, 2008
Neo Dockstation
After successfully implementing the Iconbar plugin, I wanted to do more. Unfortunately, the way the Neo interface is designed, it does not leave much room to hook more than one plugin. The only way that remains is to go and edit the files and load different plugins in place of the top status bar...not a practical way!! So, here it is - the Neo Dockstation!!
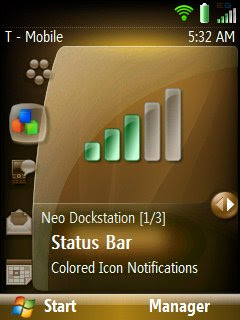
The Neo Dockstation is an assimilation of different aspects of the Neo interface (plugins, dynamic layouts and interface build up...) that finally enables one to load different plugins at the click of a button. It sits on the Neo interface like any other tab and shows the different plugins that can be loaded in the top 27 pixels of the home screen. I call it the "dockstation" because it lets you dock different plugins at the top. I won't pull it long and get to the details.
As the Neo interface uses both up and down key strokes to explore the different tabs, non-selectable plugins are most useful on the dock. That does not mean selectable plugins are not loadable, but its just that pressing the up key on the D-pad will not take you to the tab above, but to the plugin. The down key is what you will only have at your disposal to move between tabs...tiresome if you are at say the second tab and want to go to the first one!!! Feel free to try it though!
Currently, I have three custom made plugins bundled with the dockstation -
Please note the dockstation is made specifically for the Neo interface. If you are using a theme other than Neo, then it would not make much sense to install it. Here's how to get started:
1) Download this zip file - Rinku Neo Dockstation. Inside is a cab installer. Copy it over to your phone and open it. Install to the "Device". Reboot upon completion. No, you will not see any changes as yet!!!
2) Once the device restarts, goto Start>Settings>Home Screen and change over to the NeoDock theme. To begin with, this theme is same as the T-Mobile Default theme, but has some markers inside to make it compatible with the dockstation. Many of you are perhaps using Freddy's themes. Right now they are not compatible with the dockstation. You can start using them as soon as he makes them available. You do not have to go through this setup process again!!
3) The bundle installs the NeoDock Manager and the aforementioned plugins on the system. The NeoDock Manager is the utility that lets you build the Neo Dockstation. So, lets do that next. From the Start menu, open NeoDock Manager.
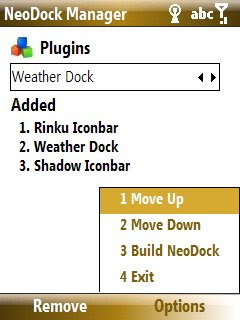
4) The Manager will search for available plugins (more on this later), and give you the options to add them to the dockstation. Play with it...its a simple utility! Once done adding the plugins, hit Options>Build NeoDock. The Manager will ask what position do you want the dockstation to be placed in on the homescreen. Once done, and everything goes well, the Neo Dockstation will be created. Exit the program to load it on the homescreen. Do not panic if your screen turns white for a second or so!!
5) You should now see the plugins you just added on a tab on the home screen - Neo Dockstation tab. To load one at the top, hit the center button. If there is a configuration utility available for a particular plugin (for e.g. the Weather Dock), then you can access it from the right softkey.
You can now switch back and forth the plugins at any time!!!!
That is it!! Well, it is as far as what I am offering in the bundle. Read "Configuring the Weather Dock" if you have questions on how to configure the weather plugin. As for those who want to add more plugins to the dockstation, read "How to make NeoDock Manager see my Plugins?". To make your custom themes (Neo only) NeoDock compatible, see "How to make a theme NeoDock compatible?".
WMP PLUGIN: The Windows Media Player plugin requires frequent redrawing of the homescreen. This can make the response on the home screen somewhat slower than usual when the plugin is in use (a song is playing). The color of the text is specified in the fontcolor attribute in \Program Files\NeoDock\Plugins\WMP\wmpplugin.xml. The format is 0xBBGGRR - a little different than usual, but helps avoid an extra processing in the plugin. The color is current set to 0xFFFFFF - white.
COLORED ICONBAR: The dockstation bundle includes all files required for the colored iconbar. You can remove earlier installs by deleting all files beginning with CHome_Iconbar_ and the iconbarplugin.dll file in \Windows. If you have made changes to the icons then copy the CHome_Iconbar_*.png files over to \Program Files\NeoDock\Plugins\Rinku Iconbar\Icons before deleting. Do not copy the dll.
PLUGIN BACKGROUND: The background for the plugins bundled with the dockstation is customizable in the xml files. Each plugin has a folder of its own in \Program Files\NeoDock\Plugins. You can see two .xml files in there - one of them is always named setup.xml. The other filename varies. You can edit this other file to specify a background for the corresponding plugin. Just change bgimage to the full path of the image you want to use as the background for the plugin. Currently, all plugins included use \windows\CHome_framework_status_bar_bg.png as the background.
I am very excited with this work since it opens up all the avenues to develop more and more custom plugins for Neo. But as always, this is no professional quality code. So, errors might come up. Please do let me know if you happen to come across a weird situation while using the bundle. It would help me polish things better. Until then, Happy Docking!

The Neo Dockstation is an assimilation of different aspects of the Neo interface (plugins, dynamic layouts and interface build up...) that finally enables one to load different plugins at the click of a button. It sits on the Neo interface like any other tab and shows the different plugins that can be loaded in the top 27 pixels of the home screen. I call it the "dockstation" because it lets you dock different plugins at the top. I won't pull it long and get to the details.
As the Neo interface uses both up and down key strokes to explore the different tabs, non-selectable plugins are most useful on the dock. That does not mean selectable plugins are not loadable, but its just that pressing the up key on the D-pad will not take you to the tab above, but to the plugin. The down key is what you will only have at your disposal to move between tabs...tiresome if you are at say the second tab and want to go to the first one!!! Feel free to try it though!
Currently, I have three custom made plugins bundled with the dockstation -
- The Colored Iconbar - Most of you already know about this. Read this if you don't!
- A Windows Media Player "Now Playing" status bar
- displays current track information (Song Title, Album Title, Original Artist), total and elapsed time, and a graphical elapsed status bar.
- A Weather dock powered by Yahoo! Weather
- displays temperature, feels like and wind speed for a US Zip Code or Yahoo! Location ID, today and tomorrow forecast with lows and highs, customizable update frequency, color codes and units.
Please note the dockstation is made specifically for the Neo interface. If you are using a theme other than Neo, then it would not make much sense to install it. Here's how to get started:
1) Download this zip file - Rinku Neo Dockstation. Inside is a cab installer. Copy it over to your phone and open it. Install to the "Device". Reboot upon completion. No, you will not see any changes as yet!!!
2) Once the device restarts, goto Start>Settings>Home Screen and change over to the NeoDock theme. To begin with, this theme is same as the T-Mobile Default theme, but has some markers inside to make it compatible with the dockstation. Many of you are perhaps using Freddy's themes. Right now they are not compatible with the dockstation. You can start using them as soon as he makes them available. You do not have to go through this setup process again!!
3) The bundle installs the NeoDock Manager and the aforementioned plugins on the system. The NeoDock Manager is the utility that lets you build the Neo Dockstation. So, lets do that next. From the Start menu, open NeoDock Manager.

4) The Manager will search for available plugins (more on this later), and give you the options to add them to the dockstation. Play with it...its a simple utility! Once done adding the plugins, hit Options>Build NeoDock. The Manager will ask what position do you want the dockstation to be placed in on the homescreen. Once done, and everything goes well, the Neo Dockstation will be created. Exit the program to load it on the homescreen. Do not panic if your screen turns white for a second or so!!

5) You should now see the plugins you just added on a tab on the home screen - Neo Dockstation tab. To load one at the top, hit the center button. If there is a configuration utility available for a particular plugin (for e.g. the Weather Dock), then you can access it from the right softkey.
You can now switch back and forth the plugins at any time!!!!
That is it!! Well, it is as far as what I am offering in the bundle. Read "Configuring the Weather Dock" if you have questions on how to configure the weather plugin. As for those who want to add more plugins to the dockstation, read "How to make NeoDock Manager see my Plugins?". To make your custom themes (Neo only) NeoDock compatible, see "How to make a theme NeoDock compatible?".
WMP PLUGIN: The Windows Media Player plugin requires frequent redrawing of the homescreen. This can make the response on the home screen somewhat slower than usual when the plugin is in use (a song is playing). The color of the text is specified in the fontcolor attribute in \Program Files\NeoDock\Plugins\WMP\wmpplugin.xml. The format is 0xBBGGRR - a little different than usual, but helps avoid an extra processing in the plugin. The color is current set to 0xFFFFFF - white.
COLORED ICONBAR: The dockstation bundle includes all files required for the colored iconbar. You can remove earlier installs by deleting all files beginning with CHome_Iconbar_ and the iconbarplugin.dll file in \Windows. If you have made changes to the icons then copy the CHome_Iconbar_*.png files over to \Program Files\NeoDock\Plugins\Rinku Iconbar\Icons before deleting. Do not copy the dll.
PLUGIN BACKGROUND: The background for the plugins bundled with the dockstation is customizable in the xml files. Each plugin has a folder of its own in \Program Files\NeoDock\Plugins. You can see two .xml files in there - one of them is always named setup.xml. The other filename varies. You can edit this other file to specify a background for the corresponding plugin. Just change bgimage to the full path of the image you want to use as the background for the plugin. Currently, all plugins included use \windows\CHome_framework_status_bar_bg.png as the background.
I am very excited with this work since it opens up all the avenues to develop more and more custom plugins for Neo. But as always, this is no professional quality code. So, errors might come up. Please do let me know if you happen to come across a weird situation while using the bundle. It would help me polish things better. Until then, Happy Docking!
Wednesday, January 30, 2008
Iconbar Plugin Update 2
Its here!! For those who are not happy with the black background on the Iconbar plugin, or are willing to have their own notification icons, this update to the plugin is just meant for that. I have finally completed detaching the icons from the dll. All icons, including the background, are now read from .png files, meaning, if you don't like an icon, just change the file.
Make sure you have a running version of the plugin. If not, then see Colored Iconbar Plugin for instructions and then head back here to perform the update.

1. Change over to a different theme, one not using the plugin. Reboot.
2. Download this zip file - Rinku Iconbar Plugin Update 2. Using ActiveSync, copy the contents of the Iconbar folder in the zip file to \Windows on your phone.
3. Change back to the original theme.
The icon file names are self explanatory. Each file begins with the prefix CHome_Iconbar_. Just change the appropriate file to change an icon, or the background. The background image in the zip file is for the T-Mobile Default theme. Note that all icons are 20x20 32-bpp PNG files, except for the background image which is 240x27 and four other files which are 6x5. I had to restrict any changes to the battery meter icon since its drawn dynamically depending on the battery strength left.
TIP: If you want your icons to appear the same on any background, make sure you set the proper transparency levels on the pixels on the edges of the icons. Use the alpha channel!!
So let your creativity loose and please do let me know what you come up with.
Monday, January 21, 2008
myFaves Revisited
After the initial bug found in the my5Notifier, I decided to redo the whole project. Here is what I have now -
1. First, you need to have the myFaves interface enabled on the homescreen. If you already have it, then skip to Step 2. You can enable the interface using a simple registry edit.
In HKLM\Software\Microsoft\CHome\CMyFaves, change the REG_DWORD entry named Disabled value to 0. Also, under HKLM\Software\Microsoft\CHome, the Plugins string value entry should have CMyFaves in the semi-colon separated list.
2. Using a 3rd party Task Manager (a free one is available here), delete any running processes that goes by the names - My5MsgCenter.exe and myFavesService.exe. These processes are started by the myFaves interface and are of no use if you do not have a myFaves account.
3. Now, download this cab file - Rinku's My5 Bundle. Copy it to your phone using ActiveSync. Open the file from your phone. Choose "Device" as your installation destination. The installation will start. Once again, after the installation, your current myFaves contacts will be erased!!! Let the phone reboot.
4. The installer places the following files in your phone:
My5.exe in \Program Files\My5
My5MsgCenter.exe in \Windows
my5MAPI.dll in \Windows
My5 shortcut in the Start menu
5. The first thing you should do after the installation is to open the editor from Start>My5 and enter your contacts.
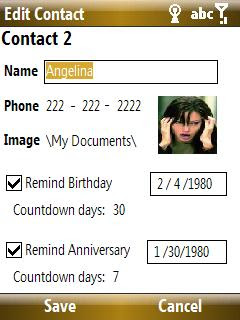
The editor lets you enter the name, phone number, image source and reminder settings for the contact. You do not have to type the entire image path; just delete whatever is there and a file explorer will open to help you choose the file you want. Save the information when done.
6. Once done entering the contact information, exit out of My5 and go back to the home screen. The interface should now be updated with your contacts. Reload the home screen if you do not see them there.
You can go back to the editor anytime and change your contacts. Missed call and unread message notifications are retained if you just make changes to the name, image or reminder settings of a contact. However, if you change the number of the contact, these notifications are reset.
Please do leave your feedback.
- A Contacts editor
- A light weight replacement for My5MsgCenter to facilitate the notifications
- Disabling the NoLog generation
- Missed calls, Unread SMS, Birthday and Anniversary reminders
1. First, you need to have the myFaves interface enabled on the homescreen. If you already have it, then skip to Step 2. You can enable the interface using a simple registry edit.
In HKLM\Software\Microsoft\CHome\CMyFaves, change the REG_DWORD entry named Disabled value to 0. Also, under HKLM\Software\Microsoft\CHome, the Plugins string value entry should have CMyFaves in the semi-colon separated list.
2. Using a 3rd party Task Manager (a free one is available here), delete any running processes that goes by the names - My5MsgCenter.exe and myFavesService.exe. These processes are started by the myFaves interface and are of no use if you do not have a myFaves account.
3. Now, download this cab file - Rinku's My5 Bundle. Copy it to your phone using ActiveSync. Open the file from your phone. Choose "Device" as your installation destination. The installation will start. Once again, after the installation, your current myFaves contacts will be erased!!! Let the phone reboot.
4. The installer places the following files in your phone:
My5.exe in \Program Files\My5
My5MsgCenter.exe in \Windows
my5MAPI.dll in \Windows
My5 shortcut in the Start menu
5. The first thing you should do after the installation is to open the editor from Start>My5 and enter your contacts.

The editor lets you enter the name, phone number, image source and reminder settings for the contact. You do not have to type the entire image path; just delete whatever is there and a file explorer will open to help you choose the file you want. Save the information when done.
6. Once done entering the contact information, exit out of My5 and go back to the home screen. The interface should now be updated with your contacts. Reload the home screen if you do not see them there.
You can go back to the editor anytime and change your contacts. Missed call and unread message notifications are retained if you just make changes to the name, image or reminder settings of a contact. However, if you change the number of the contact, these notifications are reset.
Please do leave your feedback.
Thursday, January 17, 2008
Your favorite application on the Shortcut Key
Paul from Modaco has already released an utility that adds all your applications in the start menu to the Shortcut Key configuration program. If you have not tried the utility, and just want to access you favorite application using the Shortcut key, here is what is to be done.
1. See HKEY_LOCAL_MACHINE\Software\HTC\HTCSideButton. You will see these string value entries named '0', '1', '2', and so on. Well, those are the programs that appear in the configuration program. Create the following string value (REG_SZ) key -
Name = the next number in the list, if you have numbers upto '4', then name this key '5'
Data = path to your favorite program; for example, \Windows\Start Menu\Task Manager.lnk
2. If you now go to Start>Settings>Shortcut Key, the application you just added (Task Manager for the example) would be an option listed for "Short Press" and "Press and hold". Select it the way you like it.
Repeat Step 1 if you want more applications to show up on the list.
Note: The name that appears on the list is extracted from the path that you entered as part of the registry key. For example, if I give the path as \Windows\Start Menu\Task Manager.lnk, then I shall see the name Task Manager in the list. Task Manager.lnk is actually a shortcut that points to \Windows\IA_Task_Manager.exe. I can as well give the path as \Windows\IA_Task_Manager.exe, but in this case the name would appear as IA_Task_Manager in the list...not so nice!! So, I used the shortcut.
Tuesday, January 15, 2008
Iconbar Plugin Update

I added some more notifications to the iconbar. Notifications now include -
- missed calls
- new message
- new voicemail
- bluetooth status (on/off)
- wifi status (off/on/networks available/connecting/connected)
- signal strength (with EDGE and GPRS detection and "in use" indicator)
- radio off (no signal bars)
- battery meter fixed (read details below)
- battery fault or no battery
- ringer off
- vibrate on (precedence over ringer off)
- bluetooth handsfree
- headset present (more precedence over bluetooth hansfree)
- calls forwarded
- SIM status (not present/invalid/blocked)
Battery Meter:
The battery meter has been fixed from the previous release. I did not offset the value by 19% but used a different API to get the remaining battery strength. The battery meter now has a "15 pixel high" level indicator. The number of bars filling up the battery = Battery Life Percent/6.66. Besides that the usual color code is maintained: Green(>75%), Yellow(>50%), Orange (>25%) and Red (<25%). style="font-weight: bold;">Priority ordering:
Due to the limited spacing, I had to impose some priority ordering on the icons. A headset present notification overrides a bluetooth handsfree present notification. Remeber, a bluetooth handsfree icon will not appear if you have bluetooth turned off!! A vibrate on notification overrides a ringer off notification.
Signal strength:
If you turn off the phone radio, no signal bars will appear. The signal bars now show a dim "E" and a "G" at the top, if the EDGE and GPRS networks are available in your area. The letter glows if you are actually using one. SIM notifications appear in this region.
Okay then, how to get the new dll and replace the existing one. If you have not installed the plugin yet, then follow the instructions here. The dll file over there is the new one...so, no need for update!! If you just want to install the new dll, then follow these instructions.
1. Change over to a different theme, one not running the plugin. Reboot.
2. Download the new dll from here and with ActiveSync copy it over to \Windows.
3. Change over to your original theme. If asked for confirmation, say "Yes".
4. Reboot.
I think I am done with most of the notifications. What remains are the "in call" ones, but that will be handy after I am able to overwrite window titlebar icons. This might take some time (school starts in 5 days), but hang on!!
Idea: I was thinking over the idea of turning this whole "iconbar" concept to a "dockstation". The idea is to have a tab on your home screen that lets you choose what "dock" (perhaps like a notification dock or an instant message dock) you want currently visible on the iconbar space. Just an idea...feedback on design will be appreciated!
Good Day.
UPDATE: Please see Iconbar plugin update 2.
Monday, January 14, 2008
Iconbar Cab Installer
Freddy Reyes developed a cab installer for the iconbar plugin - Thanks Freddy!! Use it for easy installation - CAB. He also updated his themes with required changes to the xml files. So, check his website for the new installers.
Sunday, January 13, 2008
Colored Iconbar Plugin

I developed this plugin because I got tired of those monochrome icons at the top of the colorful home screen. With this plugin I have been able to replace most of the basic icons that appear on the iconbar. If you intend to install this plugin, then let me tell you that the plugin does not implement all possible notifications available in the original iconbar. The things I have implemented for now are as follows.
- missed call(s)
- unread message(s)
- new voicemail
- bluetooth status (on/off)
- wifi status (off/on/networks available/connecting/connected)
- signal strength
- battery meter (green-yellow-orange-red)
- ringer off
- bluetooth handsfree
- headset present (more precedence over bluetooth hansfree)
Here are the steps to adding this plugin.
1. Using ActiveSync, browse down to \Windows of your phone. Copy the file cmhome.home.xml to your Desktop. This file describes the T-Mobile Default theme. If you are trying this on other themes then you need to find the appropriate .xml file describing the theme. It would either be in \Windows or \Application Data\Home. Create a copy of this file and keep it as a backup. Right click on the file on your desktop and select Properties. Make sure the Read Only property is unchecked.
2. Open the file in Notepad. Look for the following block of code towards the end.
<plugin clsid="{837FC251-FE69-43ad-84E0-EBCEDEBA0884}" name="iconbar" height="20">
<iconbar fgcolor="COLOR_TRAYTEXT"/>
<background bgimage="\windows\CHome_framework_status_bar_bg.png" halign="center" bgcolor="COLOR_TRAYGRADLEFT" b-border-color="COLOR_WINDOWFRAME"/>
</plugin>
Remove it and put the following block.
<plugin clsid="{B06A8DAB-E148-40d5-BE8F-3C494ABF3046}" name="iconbar" height="27">
</plugin>
3. Save the file. Overwrite cmhome.home.xml in \Windows and \Application Data\Home with the file on your desktop.
4. Open CeRegistryEditor (or a registry editor of your choice). Right click on \HKEY_CLASSES_ROOT\CLSID and create the new key {B06A8DAB-E148-40d5-BE8F-3C494ABF3046}.
5. Right click on HKEY_CLASSES_ROOT\CLSID\{B06A8DAB-E148-40d5-BE8F-3C494ABF3046} and create the new key InProcServer32.
6. Click on HKEY_CLASSES_ROOT\CLSID\{B06A8DAB-E148-40d5-BE8F-3C494ABF3046}\InProcServer32
and create a new string value (REG_SZ) entry: Value = iconbarplugin.dll . Check "Set as default key's value". The name of the key would automatically appear as Default.
7. Now download this plugin file - iconbarplugin.dll and copy it over to \Windows on your phone.
8. Go to Start>Setting>Home Screen and change the "Home Screen Layout" to something other than "T-Mobile Default". Once the change takes place, go and change it back. If the phone asks for confirmation about running iconbarplugin.dll, say Yes.
9. Turn off your phone and switch it back on. The new plugin should now be active.
You should be able to figure out what the icons mean. But here are a few pointers.
Wifi:
Red: On but no network available.
Orange: Network(s) available.
Orange/Green: Connecting to a network.
Green: Connected.
Signal Strength:
5 green bar: >90%
4 green bar: >70%
3 green bar: >50%
2 green bar: >20%
1 green bar: >0%
5 grey bar: No signal!!
Battery meter:
Green: >75% remaining
Yellow: >50% remaining
Orange: >25% remaining
Red: <25%
UPDATE: Please see Iconbar plugin update for updated information on the features of the plugin. You do not have to perform the steps there if you just installed the plugin.
UPDATE: Please see Iconbar plugin update 2.
Sunday, January 6, 2008
Enabling Notifications in the myFaves Interface
This article is outdated. Please see myFaves Revisited for updated instructions.
After enabling myFaves on my Shadow, I found that the notifications were not working, like missed calls, messages, and reminders. Besides, myFaves adds your five favorite numbers to the no-log list, which essentially stops you from receiving notifications from these numbers in the usual notifications tab. This is because (as I think), the my5 service starts doing that for you, intercepting calls and messages and giving the proper notifications on the myFaves interface. Without a myFaves account, the my5 service does not work, and so, although I managed to enable the interface, much of its benefits are not present.
Fortunately, I managed to gather some understanding of the registry entries that are changed by the my5 service in order to facilitate the notifications. I ended up writing my own my5Notifier, which while running in the background, makes the appropriate changes to the registry and triggers the myFaves interface to read from.
This tutorial shall require deleting your call history as of now and installing the my5Notifier I shall provide. So, if you are not keen on doing that, then perhaps, I cannot yet tell you how to enable the notifications. Also, the notifier can currently handle only missed calls and reminders. As my development proceeds, I shall release updates to the my5Notifier and am hoping that at some point in time the application will grow up enough to enable contacts modifications without entering the registry.
So, here we go!!
1. Enable the myFaves interface as shown in the previous post and make sure it is working as a dialer. Then backup your registry.
2. Open up CeRegistryEditor and make the following changes to the entries you just made in Step 1.
In HKLM/Software/HTC/My5/My5App/Contact_0, change the format of the phone number in the PhoneDash entry to (XXX) XXX-XXXX.
In HKLM/Software/HTC/My5/My5App/Contact_0, change the value of the State string value entry to 2.
In HKLM/Software/Microsoft/CHome/CMyFaves/0, change the format of the phone number in the Phone entry to (XXX) XXX-XXXX.
Do these two changes for the other contacts as well, 1 through 4.
3. In HKLM/Security/Phone/NoLog, make sure that the List entry is empty. If there is something in there, remove them and enter a blank space.
4. On your phone, go to Start > Call History. From the Menu, select "Delete List" to clear up the call history. Then reboot the phone.
5. In HKLM/Security/Phone/NoLog, check the List entry. Your myFaves numbers should have come up there.
6. In HKLM/Software/Microsoft/CHome/CMyFaves/0, make sure the following entries exist besides Image, Name and Phone. The entries below are DWORD (Type REG_DWORD). If they do not exist, create them.
AnniversaryDaysCount = 0
BirthdayDaysCount = 0
MessageCount = 0
MissedCallCount = 0
Notifications = 0
Now for some custom data about this contact. In HKLM/Software/HTC/My5/My5App/Contact_0/Data, change the following:
AnniversaryDate = the anniversary date. I shall show you how to input this date in a while.
AnniversaryDaysCount = number of days prior to the anniversary date you want notifications to begin.
BirthDayDate = the birthday date.
BirthdayDaysCount = number of days prior to the birthday date you want notifications to begin.
The AnniversaryDaysCount and BirthdayDaysCount are REG_SZ entries. Create them if they do not exist. The AnniversaryDate and BirthDayDate are REG_BINARY entries. Create them if they do no exist.
Okay, here's how the date is to be entered. Lets do it for 2008 January Sunday 6, 14:20:23:00
Conversion:
Year 2008: In hex it is 07D8. Swap the bytes (first and second halves), you get D807.
Month January=1: Hex=0001. After swap = 0100.
Day Sunday=0: Hex=0000. After swap = 0000.
Date 6: Hex=0006. After swap = 0600.
Hour 14: Hex=000E. After swap = 0E00.
Min 20: Hex=0014. After swap = 1400.
Sec 23: Hex=0017. After swap = 1700.
Millisec 00: Hex=0000. After swap = 0000.
So, the entry you would make is D8070100000006000E00140017000000. If you do not know how to convert decimal to hex, use the calculator on your PC. Also, please enter a valid date. I am not over-burdening the notifier to check for date validity.
7. Repeat Step 6 for the other contacts.
8. Now download this application - my5Notifier. Copy the application to a folder of your choice. Create a shortcut to it, and move the shortcut to \Windows\Start up. This would start the notifier as soon as you reboot.
9. Reboot the phone. Upon start, the my5Notifier will begin execution. Press the Home key to go back to your usual home screen. Sorry for this extra key press!! I shall soon create a service dll for it.
That should do it!! Sorry for the registry tweaks you have to do to enter simple information. The my5Notifier is currently being improved and I intend to add the following improvements to it.
-SMS notifications
-Change contact information in the application
-Convert the application into a service dll
Known bug: If the phone keypad locks while at the myFaves Interface, then the next time you unlock the keypad, only the last shown notification is displayed (meaning it does not change over to a different type, as in the image above). A workaround to this is to press the start key, and then the home key. I do not know yet if the problem is from the myFaves interface or the notifier.
Besides, I did my part of the testing with the notifier, but there will always be some bug I might have missed. So please do let me know if you find one. I will release the source code after development.
Please read "A Quick Follow-Up".
After enabling myFaves on my Shadow, I found that the notifications were not working, like missed calls, messages, and reminders. Besides, myFaves adds your five favorite numbers to the no-log list, which essentially stops you from receiving notifications from these numbers in the usual notifications tab. This is because (as I think), the my5 service starts doing that for you, intercepting calls and messages and giving the proper notifications on the myFaves interface. Without a myFaves account, the my5 service does not work, and so, although I managed to enable the interface, much of its benefits are not present.
Fortunately, I managed to gather some understanding of the registry entries that are changed by the my5 service in order to facilitate the notifications. I ended up writing my own my5Notifier, which while running in the background, makes the appropriate changes to the registry and triggers the myFaves interface to read from.

This tutorial shall require deleting your call history as of now and installing the my5Notifier I shall provide. So, if you are not keen on doing that, then perhaps, I cannot yet tell you how to enable the notifications. Also, the notifier can currently handle only missed calls and reminders. As my development proceeds, I shall release updates to the my5Notifier and am hoping that at some point in time the application will grow up enough to enable contacts modifications without entering the registry.
So, here we go!!
1. Enable the myFaves interface as shown in the previous post and make sure it is working as a dialer. Then backup your registry.
2. Open up CeRegistryEditor and make the following changes to the entries you just made in Step 1.
In HKLM/Software/HTC/My5/My5App/Contact_0, change the format of the phone number in the PhoneDash entry to (XXX) XXX-XXXX.
In HKLM/Software/HTC/My5/My5App/Contact_0, change the value of the State string value entry to 2.
In HKLM/Software/Microsoft/CHome/CMyFaves/0, change the format of the phone number in the Phone entry to (XXX) XXX-XXXX.
Do these two changes for the other contacts as well, 1 through 4.
3. In HKLM/Security/Phone/NoLog, make sure that the List entry is empty. If there is something in there, remove them and enter a blank space.
4. On your phone, go to Start > Call History. From the Menu, select "Delete List" to clear up the call history. Then reboot the phone.
5. In HKLM/Security/Phone/NoLog, check the List entry. Your myFaves numbers should have come up there.
6. In HKLM/Software/Microsoft/CHome/CMyFaves/0, make sure the following entries exist besides Image, Name and Phone. The entries below are DWORD (Type REG_DWORD). If they do not exist, create them.
AnniversaryDaysCount = 0
BirthdayDaysCount = 0
MessageCount = 0
MissedCallCount = 0
Notifications = 0
Now for some custom data about this contact. In HKLM/Software/HTC/My5/My5App/Contact_0/Data, change the following:
AnniversaryDate = the anniversary date. I shall show you how to input this date in a while.
AnniversaryDaysCount = number of days prior to the anniversary date you want notifications to begin.
BirthDayDate = the birthday date.
BirthdayDaysCount = number of days prior to the birthday date you want notifications to begin.
The AnniversaryDaysCount and BirthdayDaysCount are REG_SZ entries. Create them if they do not exist. The AnniversaryDate and BirthDayDate are REG_BINARY entries. Create them if they do no exist.
Okay, here's how the date is to be entered. Lets do it for 2008 January Sunday 6, 14:20:23:00
Conversion:
Year 2008: In hex it is 07D8. Swap the bytes (first and second halves), you get D807.
Month January=1: Hex=0001. After swap = 0100.
Day Sunday=0: Hex=0000. After swap = 0000.
Date 6: Hex=0006. After swap = 0600.
Hour 14: Hex=000E. After swap = 0E00.
Min 20: Hex=0014. After swap = 1400.
Sec 23: Hex=0017. After swap = 1700.
Millisec 00: Hex=0000. After swap = 0000.
So, the entry you would make is D8070100000006000E00140017000000. If you do not know how to convert decimal to hex, use the calculator on your PC. Also, please enter a valid date. I am not over-burdening the notifier to check for date validity.
7. Repeat Step 6 for the other contacts.
8. Now download this application - my5Notifier. Copy the application to a folder of your choice. Create a shortcut to it, and move the shortcut to \Windows\Start up. This would start the notifier as soon as you reboot.
9. Reboot the phone. Upon start, the my5Notifier will begin execution. Press the Home key to go back to your usual home screen. Sorry for this extra key press!! I shall soon create a service dll for it.
That should do it!! Sorry for the registry tweaks you have to do to enter simple information. The my5Notifier is currently being improved and I intend to add the following improvements to it.
-SMS notifications
-Change contact information in the application
-Convert the application into a service dll
Known bug: If the phone keypad locks while at the myFaves Interface, then the next time you unlock the keypad, only the last shown notification is displayed (meaning it does not change over to a different type, as in the image above). A workaround to this is to press the start key, and then the home key. I do not know yet if the problem is from the myFaves interface or the notifier.
Besides, I did my part of the testing with the notifier, but there will always be some bug I might have missed. So please do let me know if you find one. I will release the source code after development.
Please read "A Quick Follow-Up".
Thursday, January 3, 2008
Enabling the myFaves Interface
This article is outdated. Please see myFaves Revisted for updated instructions.
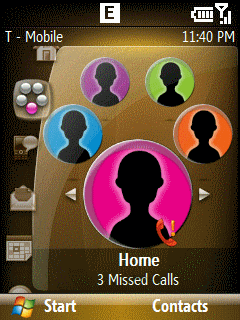
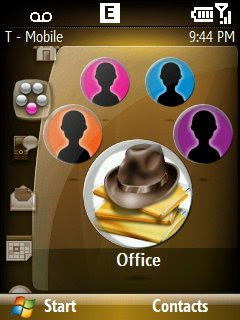
The tutorial here shows the steps required to enable the myFaves interface for those who do not have a myFaves account with T-Mobile. The interface acts as a fast dialer for five of your favorite numbers.
1. Connect your Shadow to the PC. App-Unlock your phone - I used SDA_ApplicationUnlock. Download the exe and run it from your PC while keeping the phone connected and ActiveSync running. Once done, start CeRegistryEditor.
2. Go to HKLM/Software/Microsoft/CHome/CMyFaves. Change the data value of the REG_DWORD entry Disabled from 1 to 0.
3. Click on HKLM/Software/Microsoft/CHome/CMyFaves/0. Make the following changes to the entries there.
Image = full image path to the picture you want to show for this contact, e.g. \windows\myFaves_silhouette_0.jpg
Name = name of the contact
Phone = phone number of the contact in the format XXX-XXX-XXXX, e.g. 123-45-6789
4. Click on HKLM/Software/HTC/My5/My5App. Collapse the tree by clicking on the '+' sign .
5. Click on Contact_0. Edit the following entries for this key.
ImageSrc = same image path as you gave on Step 3.
Name = same name you gave on Step 3.
PhoneDash = same phone number you entered for Phone in Step 3.
PhoneNumber = same phone number but without the dashes.
6. Now perform Step 3 to 5 for the other contacts - 1 through 4.
7. Click on HKLM/Software/Microsoft/CHome. For the Plugins entry in the key, make sure you have CMyFaves in the semicolon separated list. If not, add it.
8. Reboot your phone and you should now have the myFaves dialer on the home screen.
The actual functionality of the myFaves interface is revealed when you enable the notifications for the contacts. You can essentially set reminders for anniversaries, birthdays and all. I shall soon talk about enabling those in the interface.
The tutorial here shows the steps required to enable the myFaves interface for those who do not have a myFaves account with T-Mobile. The interface acts as a fast dialer for five of your favorite numbers.

1. Connect your Shadow to the PC. App-Unlock your phone - I used SDA_ApplicationUnlock. Download the exe and run it from your PC while keeping the phone connected and ActiveSync running. Once done, start CeRegistryEditor.
2. Go to HKLM/Software/Microsoft/CHome/CMyFaves. Change the data value of the REG_DWORD entry Disabled from 1 to 0.
3. Click on HKLM/Software/Microsoft/CHome/CMyFaves/0. Make the following changes to the entries there.
Image = full image path to the picture you want to show for this contact, e.g. \windows\myFaves_silhouette_0.jpg
Name = name of the contact
Phone = phone number of the contact in the format XXX-XXX-XXXX, e.g. 123-45-6789
4. Click on HKLM/Software/HTC/My5/My5App. Collapse the tree by clicking on the '+' sign .
5. Click on Contact_0. Edit the following entries for this key.
ImageSrc = same image path as you gave on Step 3.
Name = same name you gave on Step 3.
PhoneDash = same phone number you entered for Phone in Step 3.
PhoneNumber = same phone number but without the dashes.
6. Now perform Step 3 to 5 for the other contacts - 1 through 4.
7. Click on HKLM/Software/Microsoft/CHome. For the Plugins entry in the key, make sure you have CMyFaves in the semicolon separated list. If not, add it.
8. Reboot your phone and you should now have the myFaves dialer on the home screen.
The actual functionality of the myFaves interface is revealed when you enable the notifications for the contacts. You can essentially set reminders for anniversaries, birthdays and all. I shall soon talk about enabling those in the interface.
Removing Contacts from Home Screen
If you do not want your Contacts to map on to the Right SOFT key on the home screen (when the clock in showing), then there is small hack that lets you map it to anything else you want.
Goto HKLM/Software/Microsoft/CHome and click on CClock. Note the SK2TEXT and SK2URL string value entries. Change the data value of SK2TEXT to whatever you want to appear in place of "Contacts" and change the data value of SK2URL to the path of the application you want to open when the right SOFT key is pressed.
For example, setting SK2TEXT = Task Manager and SK2URL=\windows\tasks.exe will show "Task Manager" in place of "Contacts" and will open it when the right SOFT key is pressed.
By the way, its a good customization to do because you often feel the need to open the Task Manager. Besides, the contacts can always be reached via the call button.
Wednesday, January 2, 2008
Removing (or changing) the T-Mobile Shadow Splash Screens
The T-Mobile Shadow splash is the animated sequence showing "T-Mobile Shadow". It appears during startup and shutdown. To change (or remove) the startup splash:
click on HKLM/Software/HTC/Startup. Notice the Image string value entry. Remove the data "\windows\TMO_shadow.gif" with a blank space to get rid of the splash, or change the path to an image you want to see. TMO_shadow.gif is itself an animated GIF, so yes, you can have custom animated GIFs. Try to make your custom GIF specifications same as that of TMO_shadow.gif - 240x320, 96dpi, 32-bit color. I could not make 8-bit static GIFs work!!
The same can be done for the shutdown at HKLM/Software/HTC/Shutdown.
Removing an Item from the Home Screen
For people without data plans, the t-zones item is not desired on the home screen. Removing it, or for that matter, any item from the home screen follows from our previous tutorials.
Goto HKLM/Software/Microsoft/ and click on CHome. Notice the Plugins string value, a list of items separated by semicolon. These items are what appears on the home screen. To remove t-zones, remove CLinks from the list. To remove anything else (for e.g. Photos), remove the corresponding entry (CMyPhotos for Photos).
Goto HKLM/Software/Microsoft/ and click on CHome. Notice the Plugins string value, a list of items separated by semicolon. These items are what appears on the home screen. To remove t-zones, remove CLinks from the list. To remove anything else (for e.g. Photos), remove the corresponding entry (CMyPhotos for Photos).
Changing the Order of the Items on the Home Screen
This one follows from the previous tutorial we went through.
Goto HKLM/Software/Microsoft/ and click on CHome. Notice the Plugins string value, a list of items separated by semicolon. The order of these items determine the order of the tabs (icons) on the home screen. So, change it to the way you like it.
Goto HKLM/Software/Microsoft/ and click on CHome. Notice the Plugins string value, a list of items separated by semicolon. The order of these items determine the order of the tabs (icons) on the home screen. So, change it to the way you like it.
Shortcuts to your Favorite Programs
This one will be a little long, but it shows the power of what you can do with these hacks. So, I am posting it soon. The instructions here are to add a "My Programs" tab to the home screen. It enables an user to add a set of frequently used programs to the home screen.

Here are some images that I have used in this tutorial - Download!
STEPS
=====
1. Connect your Shadow to the PC. Download the images in the attachment and place them in \Windows on your Shadow. You can use the Explore feature in ActiveSync to do this.
2. Start CeRegistryEditor. Press F1 to load the registry. Perform a backup of the registry (just in case). You can do this by pressing F2 and following the instructions. Also, unlock the registry by doing Tools > Unlock Registry.
3. Create the key CProgs in HKLM/Software/Microsoft/CHome.
4. In HKLM/Software/Microsoft/ click on CHome. Notice the Plugins string value. Append CProgs to the data value of Plugins. I have it as- Plugins = CClock;CHome;CMessage;CAppointments;CMusic;CMyPhotos;CProgs;Settings
The order of these items determine the order of the tabs on the home screen. So, change it if you want to.
5. Click on HKLM/Software/Microsoft/CHome/CProgs. Create a new string value entry as-
Name = GUID
Type = REG_SZ
Data = {C5A51777-B837-447d-8947-FAF3FF9D570B}
6. Create the key CProgs in HKLM/Security/cHome .
7. Create the key Page1 in HKLM/Security/cHome/CProgs .
8. Click on HKLM/Security/cHome/CProgs/Page1. We now need to create the following string value (REG_SZ) entries.

ACTIONURL = path to the program that runs when the CENTER SELECT key is pressed
GUID = {2F710F22-9F19-43fa-8F35-9927D246B078}
PICTURES = path to image that appears...see above image
SK2TEXT = text for right SOFT key....see above image
SK2URL = what happens when right SOFT key is pressed
TEXT1 = text on screen...see above image
TEXT2 = text on screen...see above image
TITLETEXT = text on screen...see above image
Just for a walkthrough, here is what I have for the Word Program in these entries.
ACTIONURL = \windows\pword.exe
GUID = {2F710F22-9F19-43fa-8F35-9927D246B078}
PICTURES = \windows\CHome_MyProgs_Word.png
SK2TEXT = New
SK2URL = \windows\pword.exe; \My Documents\Templates\New Word Document.doc
I created an empty word doc and placed it there.
TEXT1 = Word Mobile
TEXT2 = Edit Word Documents
TITLETEXT = My Programs
9. For more programs, create a Page2, Page3...and so on, and follow the instructions on Step 8. I have 3 programs, so I have Page1, Page2 and Page3.
10. Click on HKLM/Security/cHome/CProgs and create the following string value (REG_SZ) entries.
GUID = {C5A51777-B837-447d-8947-FAF3FF9D570B}
ICONPATHS = \CHome_MyProgs_sat_active.png;\CHome_MyProgs_sat_active.png;\CHome_MyProgs_desat_inactive.png
LocName = Internet
Pages = Page1;Page2;Page3
The order in which you place the Pages will be the order in which the programs shall appear.
11. The changes are saved to the registry on the Shadow as you make changes. To see the changes on the home screen, change it to something else (let the change take place) and then change it back to the T-Mobile Default.
If all went all, you should now have your favorite programs on the home screen. For the images, the Vista Icon packs are great...resize them to 150X150 and it shows up well. If you got it right, then perhaps it is not difficult to see that "My Programs" is not the only thing you can do with this process.
Here are some images that I have used in this tutorial - Download!
STEPS
=====
1. Connect your Shadow to the PC. Download the images in the attachment and place them in \Windows on your Shadow. You can use the Explore feature in ActiveSync to do this.
2. Start CeRegistryEditor. Press F1 to load the registry. Perform a backup of the registry (just in case). You can do this by pressing F2 and following the instructions. Also, unlock the registry by doing Tools > Unlock Registry.
3. Create the key CProgs in HKLM/Software/Microsoft/CHome.
4. In HKLM/Software/Microsoft/ click on CHome. Notice the Plugins string value. Append CProgs to the data value of Plugins. I have it as- Plugins = CClock;CHome;CMessage;CAppointments;CMusic;CMyPhotos;CProgs;Settings
The order of these items determine the order of the tabs on the home screen. So, change it if you want to.
5. Click on HKLM/Software/Microsoft/CHome/CProgs. Create a new string value entry as-
Name = GUID
Type = REG_SZ
Data = {C5A51777-B837-447d-8947-FAF3FF9D570B}
6. Create the key CProgs in HKLM/Security/cHome .
7. Create the key Page1 in HKLM/Security/cHome/CProgs .
8. Click on HKLM/Security/cHome/CProgs/Page1. We now need to create the following string value (REG_SZ) entries.
ACTIONURL = path to the program that runs when the CENTER SELECT key is pressed
GUID = {2F710F22-9F19-43fa-8F35-9927D246B078}
PICTURES = path to image that appears...see above image
SK2TEXT = text for right SOFT key....see above image
SK2URL = what happens when right SOFT key is pressed
TEXT1 = text on screen...see above image
TEXT2 = text on screen...see above image
TITLETEXT = text on screen...see above image
Just for a walkthrough, here is what I have for the Word Program in these entries.
ACTIONURL = \windows\pword.exe
GUID = {2F710F22-9F19-43fa-8F35-9927D246B078}
PICTURES = \windows\CHome_MyProgs_Word.png
SK2TEXT = New
SK2URL = \windows\pword.exe; \My Documents\Templates\New Word Document.doc
I created an empty word doc and placed it there.
TEXT1 = Word Mobile
TEXT2 = Edit Word Documents
TITLETEXT = My Programs
9. For more programs, create a Page2, Page3...and so on, and follow the instructions on Step 8. I have 3 programs, so I have Page1, Page2 and Page3.
10. Click on HKLM/Security/cHome/CProgs and create the following string value (REG_SZ) entries.
GUID = {C5A51777-B837-447d-8947-FAF3FF9D570B}
ICONPATHS = \CHome_MyProgs_sat_active.png;\CHome_MyProgs_sat_active.png;\CHome_MyProgs_desat_inactive.png
LocName = Internet
Pages = Page1;Page2;Page3
The order in which you place the Pages will be the order in which the programs shall appear.
11. The changes are saved to the registry on the Shadow as you make changes. To see the changes on the home screen, change it to something else (let the change take place) and then change it back to the T-Mobile Default.
If all went all, you should now have your favorite programs on the home screen. For the images, the Vista Icon packs are great...resize them to 150X150 and it shows up well. If you got it right, then perhaps it is not difficult to see that "My Programs" is not the only thing you can do with this process.
Changing IE Default Homepage
I shall begin with a very easy one - changing the default homepage for IE.
Click on
HKEY_LOCAL_MACHINE\Software\Microsoft\Internet Explorer\AboutURLs
Change
the string value home_0409 data to the URL you want.
E.g. home_0409 = http://www.google.com/m/products
Click on
HKEY_LOCAL_MACHINE\Software\Microsoft\Internet Explorer\AboutURLs
Change
the string value home_0409 data to the URL you want.
E.g. home_0409 = http://www.google.com/m/products
Tools
The tool I am using to edit the registry of my Shadow is CeRegistryEditor. All tutorials in this blog will assume that you have it installed and know how to work with it. In case any other tool is required to perform a hack, I shall point it out at the appropriate post.
Also, you will need to have ActiveSync installed on your PC to work the tutorials here.
ADVICE: Every time you are about to work on one of the tutorials here, perform a backup of the current registry. In CeRegistryEditor, you can do this by pressing F2 and following the instructions.
Lets start!!!
Also, you will need to have ActiveSync installed on your PC to work the tutorials here.
ADVICE: Every time you are about to work on one of the tutorials here, perform a backup of the current registry. In CeRegistryEditor, you can do this by pressing F2 and following the instructions.
Lets start!!!
First Post
I am trying here to assemble as many registry hacks as I can find for the T-Mobile Shadow. There are a couple I have done myself and am also constantly on the lookout for more on the Internet. Hopefully, with time, the blog will have quite a handful of the hacks.
Subscribe to:
Posts (Atom)
